


Pressure Canning Starter Wort
 Why do so many homebrewers skip starters for their liquid brewer's yeast? Pitching enough healthy cells can have a greater impact on the quality of a batch than anything else you do on brew day! Maybe because from start to finish making a starter can take almost an hour. Using an Erlenmeyer flask makes the task easier, by allowing you to boil, chill, and grow in a single vessel. Adding a stir-plate creates denser yeast cultures, the result is less wort to boil and chill for a given target cell count. Still I’m lucky if I can go from getting equipment out to pitching yeast in fewer than 30 minutes. Sometimes half an hour is hard to come by on a weeknight!
 Not anymore! My new pressure cooker allows me to produce a large volume of shelf-stable sterile wort at one time. I can produce enough wort for 10 starters in one afternoon. That way all I have to do to make a starter is sanitize my flask and add the wort and yeast, done! The key is the pressure (15 PSI) generated by the canner causes the wort to boil at 250F (121C), hot enough to kill Clostridium botulinum in a reasonable amount of time (it would take 7 to 11 hours in boiling water). While boiling at 212F (100C) is more than enough to kill all the microbes brewers usually worry about, this is only because we are working under aerobic conditions initially and pitching enough brewer’s yeast to quickly lower the pH and produce alcohol thus inhibiting the nasty microbe responsible for botulism. C. botulinum is all around us (mostly in dirt), but really thrives in the anaerobic environment created by boiling-water canning.
 If you don’t have a pressure cooker/canner there are two alternatives to prevent C. botulinum from growing in canned wort. You could add enough phosphoric or lactic acid to lower the pH of the wort below 4.4. This is acidic enough to make reasonable time hot water-bath canning safe (as it is for many fruits). Alternatively, you could store the canned wort in the refrigerator, C. botulinum will not grow if the temperature remains lower than 38F (3C). Personally the risk (however small) of botulism poisoning (paralysis followed quickly by death) with these methods isn’t worth the time/money savings!
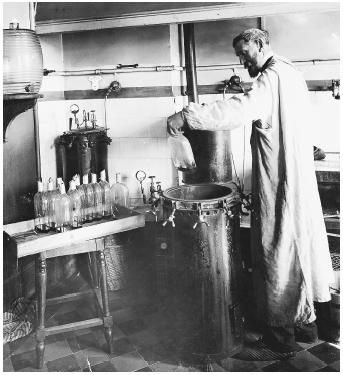
Equipment
I purchased an All-American 25 Quart Pressure Cooker/Canner a few months ago for $230. It’s super heavy-duty aluminum, and doesn't rely on a gasket to seal, so I’m expecting it to last at least the next 50 years of my brewing career. There are less expensive options, but I try to buy things that will last when I am able to. A pressure canner can also serve as an autoclave if you are planning to do sterile culturing for yeast isolation and wrangling (where sanitation isn't good enough). The All-American even looks a bit like a mini-version of the one Pasteur used. In addition you’ll need your desired-size Ball jars (which come with rings and lids) and optionally a jar lifter. That's it!
 Wort Production
You may not want to produce the same density of wort for all starter applications. I like having small jars filled with low gravity wort for harvesting microbes (8 ounce jars with 10 grams of light DME and a pinch of yeast nutrient). They are easy to take to a tasting or a bar if you want to collect bottle dregs (harvestable bottle dregs list). Pop the lid, pour the dregs in, and screw the ring back on. When you get home you can transfer the inoculated wort to a sanitized beer bottle with a No. 2 stopper and an airlock. Or simply keep the Ball jar in the fridge if you want to prevent the microbes from growing – remembering to vent the lid periodically.
 If you are planning to use the canned wort for traditional starters, Kristen England suggested canning high gravity wort (I'd keep it around 2-3 times stronger than your target starter gravity). That will allow you to can less and yield more by diluting the starters with water. It all depends on how concerned you are about the sterility of that water. I am comfortable adding bottled water directly to chilled wort without boiling/chilling. If you want starter wort that is ready to use for growing commercial brewer's yeast cultures, aim for a standard 1.040.
To reach the target gravity you can use malt extract, extra runnings from a brew, or a purpose brewed “beer” for a year’s worth of starters. If your starter wort is all-grain, I’d suggest boiling it first. At Modern Times I brewed a 3 gallon no-sparge batch that I drained directly into jars for canning. The result was the most intense DMS aroma of tomato soup I’ve ever experienced. With the high temperature and lack of steam escaping it shouldn’t have been a surprise. Not a big deal if you decant the starter wort, but it made evaluation of the microbe starters tricky until they were stepped up. Pre-boiling isn't necessary for malt extract, which has already gone through a full boil during production.
 Process
Make sure to follow the instructions for your canner when it comes to processing. Start by washing all of your equipment is hot-soapy water. Rinse with warm tap water to remove all of the soap. While you're rinsing, inspect the jars and lids for chips, dents, and cracks. Don't use any that are anything less than pristine.
Fill the jars with wort or water/DME, leaving ~3/4 inch (2 cm) of space at the top of each jar (this is necessary to form an adequate vacuum during cooling). Hand-tighten the rings over the lids. The ring only holds the lid in place during processing, so it doesn't need to be too tight. Arrange the jars in the canner on the rack, trying to leave a little room around each one to promote even heating. Add hot tap water to the canner, enough to come a few inches up the jars. You can add a second level of jars on another rack if they fit. Lock the lid on the pressure canner.
Begin heating on high. Once steam is escaping from the vent, wait seven minutes, and then install the weight. At this point the pressure will slowly rise. Once 15 PSI is reached, the weight will begin to sputter, hiss, and rattle. Only now do you begin the timer (15 minutes for 8 oz jars, plus 1 minute for every 1,000 feet above sea level to compensate for the lower ambient air pressure). Adjust the heat so that the weight continues releasing pressure, but it doesn't nee to be violent. After the time is complete, turn off the heat and allow the pressure to dissipate slowly. Once the pressure returns to 0, remove the weight and then the pressure canner's lid.
 Once the jars cool completely, press gently in the center of each lid. If they pop up and down this indicates that the vacuum seal was not successful. The wort is these jars should be used immediately or discarded. Partially unscrew the rings on the successfully sealed jars. At this point the suction of the vacuum in the headspace is holding the lid on. If this vacuum fails to hold the lid at any point, discard the starter wort in that jar. Only use the lids once, but the jars and rings can be saved and reused as long as they remain undamaged.
At the moment I have six empty sour-beer-only carboys, so I’ll be harvesting some fun microbes. Starting with a couple raspberries still hanging on the bush in our backyard. I also have some exciting sour beers I have hanging out in the basement in need of harvesting as well (Russian River Beatification, Trillium Lineage Wheat and Rye, Cuvee de Ranke, and a bunch of gueuze).

Feel free to post any additional tips or chili recipes in the comments!


38 comments:
Hi there! Love your website. Just wanted to mention there is actually a third option for preventing C. botulinum in your starters, a technique I learned as a commercial gourmet mushroom grower. It's called Tyndallization, which involves heating the wort to 100 C two or three times, the first time you kill off the live bacteria but the spores survive, you then wait a day or two for the surviving spores to germinate then you heat it again, killing off the remaining bacteria http://en.wikipedia.org/wiki/Tyndallization definitely not as good as straight up pressure cooking, but it is an option!
I'd add that if you have hard water (mine's crazy actually), add a couple of tablespoons of white vinegar to the pressure cooker water or you'll end up with nasty mineral deposits all over the glass jars. I learned that the hard way.
Make sure you always let the pressure drop in the cooker on its own post boil. If you try to rush it, or open it early, the release of pressure will cause a boil over in your containers and you will lose the bulk of your wort/work.
Awesome stuff! You can't get much closer to a lab protocol than this. The only improvement I can think of is using autoclavable Pyrex media bottles, as they would probably last longer than Mason jars and are certainly more heat and pressure resistant. However they do tend to be a bit pricier.
Thanks for this post. Does anyone else know somewhere to buy bulk lids? I hadn't thought about it being a bad idea to reuse the lids, but it seems obvious now.
Also, when the C. botulinum starts growing, what does it look like? I made some starter wort a while ago and poured it into ball jars before cooling. All of the jars sucked down but had a bunch of poudery stuff in the bottom I assumed was hot break since it was an all grain batch. A few of them had a slimy thing grow in them (naturally I didnt use those). Im thinking Ill toss all the wort now but Im wondering what to do with the berliner I have going now that had starters made from that wort...
I have the same pressure cooker and have another great use for you. Get the biggest pot that can fit inside and you can do a hands free decoction or cereal mash.
For my lagers I pull off the third decoction and let it rip in the pressure cooker. I get the same color and flavor that a laborious stir session on an open pot produces. You could also do a serious first wort carmelization for a scotch ale which I have yet to try.
By third decoction, I meant 1/3 of the thick part of the mash.
Would just freezing the wort kill off any bacteria? Any other ill effects? I wonder as Speidel (Braumeister) recommends freezing a part of the wort until time for bottling.
Good tip on adding vinegar. My water isn't particularly hard and I still get a white coating when I can. I'll give it a shot!
Most places that sell Mason jars also sell separate packs of lids: for example.
I wouldn't use starter wort that had anything growing. The problem with botulism is that it isn't the bacteria themselves that kill you, it is the toxin they produce.
Freezing won't sterilize the wort, but if you boil and then freeze in an airtight container it will prevent any microbes from growing. More of a pain to get the wort ready to use again, but a fine option if you don't mind the lag time to defrost!
I have the Instant Pot pressure cooker - the PSI for this model is just 11.6, not the 15 PSI you mention for yours.
Is 11.6 PSI enough for this procedure? Would I just need to leave it under pressure for longer?
Rob
Exactly, hopefully your pressure canner came with instructions for how long to process low-acid foods in various containers. As long as you are near sea-level you should be able to sterilize the wort in a reasonable amount of time.
My buddy and I thought this was a great idea. One of those, "why didn't we think of that" moments. So, a couple weeks ago I purchased the Presto 23 quart pressure canner/cooker (amazon $80), and yesterday we made 48 quart sized yeast starters, concentrated for two liter starters.
My friend had purchased a 50+ pound bag of DME several years ago, which had recently solidified due to moister. It didn't have anything growing on it, so we spent the better part of the afternoon melting it down and boiling it for a while to create our wort. We figured the boil and subsequent process of canning would kill anything else. We'll see. We figured we each saved ourselves 24 hours of future starter production, and kept reminding each other of that estimation as we wrestled with the "DME Ball" to keep it from scorching.
We did wonder if it would be possible to skip, or combine, the wort production step with the canning process. Could we simply measure into each jar a set amount of DME and any other additions (e.g., yeast nutrient), add hot water, stir to dissolve, and then can? It seems that the canning process would mix the starter for us, eliminating the need to produce a large batch of wort and allowing for customized gravity for different applications. Then again, it may be more labor intensive than simply making one batch and filling the jars. Thoughts?
That's what I do, weigh the DME into the jars, pinch of yeast nutrient, then top-off with cold water. No issues to report!
I'm looking to create some starter wort that will be useful for culturing not only brewers yeast and brett but also Lacto Brevis. I've read in a few different places (including your book) that Lactobacillus can rapidly lose IBU resistance if cultured in a non-bittered medium. I haven't had a lot of success determining how many IBU I'm looking for in the starter wort in order to retain resistance while minimizing the growth suppressing effects on Lacto. I was planning to aim for 5-10 but would love to hear what your thoughs are. I thought that a bottle of isomerized alpha acid might be a good solution since it would allow me to add IBUs selectively when using the starter and avoid the risk of introducing light-struck flavor from clear canning jars. Also, have you had any issues with starter wort darkening either from the pressure canning or from the sort of oxidation reactions that cause off flavors in LME and DME?
Thanks for this - I'm frequently scrambling to get a starter going the night before brew day because I'm too lazy or just can't/don't find the <1hr to do it earlier..
I've got two questions: 1) If you only use one row of jars, how high should the water outside the jars in the pressure cooker be? 1-2 inches above the top? same level as the liquid inside? Lower? (should I expect to find this information in the pressure cooker's manual?)and 2) Once you open a jar, how long would you wait to pitch it. If I make a concentrated jar and want to dilute half of it to use today, then dilute and add the other half as a 2nd step a day or two later.. do you see any problem with that?
My understanding is that in a pressure cooker the steam really does the work. As long as you have a few inches of water in the bottom, you'll be fine.
Once you open a jar of sterile wort, treat it as you would any other chilled starter wort. If you'd be comfortable making a big batch of starter and saving some in the fridge for a few days, this would be no different.
From what I understand based on previous comments, there is no need to pre-boil the wort, correct? Drew Beechum has a post on the Maltose Falcons site on this topic and it sounds like he does not pre-boil the wort either. Just confirming as this Saturday I'll be canning my first starter wort. REALLY looking forward to incorporating this time saving process into my brewing. Making starters is a necessary evil IMO, but a pain in the ass.
With malt extract there is no need to pre-boil because that happened during extract production. For all-grain wort it isn't necessary from a safety standpoint, but if you don't you'll have a DMS bomb. That'll make it hard to do any sensory evaluation on the starter.
Thanks Michael. I'm using DME, so I should be good to go. Thanks for all you do for the hobby. I really appreciate the information you share.
I found 24 screw tops and sealing lids at Walmart for around $3. Their brand. They also had ball brand. I recommend taking the screw tops off after the jar has sealed. They aren't needed and can rust if they are left in a damp area. They are reusable so you should only have to buy the sealing lid. Most canning books reccomend not reusing the sealing tops.
How long will canned wort keep?
Done correctly, and it'll remain microbe-free until the lid fails. Some canned food is viable for 100 years or more. Not sure if the nutrient quality will diminish with time, it'll likely darken too as time passes.
Does the 25 qt model fit a 2L flask if you wanted to sterilize it?
My 2L flask fits, maybe ~1/2" below the top lip. It could be an inch or so higher as the lid domes up.
Hi, thank you for this awesome technique. I still have some doubt. Do you store you're mason jar "ready to use" in the refrigerator, or it's not necessary when a pressure cooker is used? And when you prepare a starter, do you boil it again? If not, there would be a problem in doing it or it's just useless? Last question sorry :).. how can i find out the pression of my cooker and how much of it it's enough? I suspect mine doesn't get a very high pressure but maybe i can solve it just boiling for several time... Thanks a lot.. Lorenzo
Properly pressure canned wort (or anything for that matter) can be stored at room temperature. If you boil again, there is no problem, but you'd also remove the time savings.
There should be a weight that indicates how much pressure is being applied. If you can't reach the full pressure, you'd need to look at other resources to adjust the time. Lower pressures can require exponentially more time to sterilize!
Can we use autoclave to boil wort also prior to sterilisation too as boiling large qty of wort is difficult for us and we hv autoclave in our facility
That would be essentially equivalent to not boiling it prior to canning. If steam isn't allowed to escape from all-grain wort, you'll end up with a high level of DMS in the wort.
Thanks a lot for this post, it is really helpful. You give a 15 minute time to boil / steam 8oz of wort. I'm going to use 32 oz quart jars. Do I boil for the same amount of time, double, or something else? How do I figure it out?
The same amount of time is required once the wort gets up to temperature, it just takes longer for that to happen the bigger the jars are. Looks at the USDA website the time goes up roughly 50% going from pint to quart. I see 20-30 minutes suggested on Homebrewtalk for quart jars, so I'd go on the high end to be safe!
Yes. I do this
I read your blog last night and have made the decision to start canning pint's of wort to dilute for 1 liter starters. I used a product (Fast Pitch) that was a huge time saver, but this product has vanished.
I plan to make concentrated pints, so my DME ratio will be 100 grams of DME per pint, then that will dilute to a one liter starter when needed.
I have an electric (Cuisinart) counter-top pressure cooker that starts the timer once pressure is reached. Since I am not sure the pressure this cooker operates at high, I'll set it for 30 minutes since I am basically at sea level. I believe this to be safe, but wanted to ask your opinion to make sure.
That's fine, just be aware that if the water you dilute with isn't sanitary your starter won't be either.
I'd find the operating instructions. Without knowing the pressure there is no way to guarantee you won't end up with botulism. Even a few degrees lower can increase the amount of time required substantially.
If I plan to make a big batch of all grain starter wort you suggest boiling to remove DMS. Are you recommending a full 60 to 90 minute boil or something less? I've decided to start pressure canning as well to save the time during the week. Thanks for your help!
Also, if I made concentrated starters, couldn't I just use distilled water for top off or would that dilute the mineral concentration of the starter too much? When boiling on the stove with DME I always used distilled...
I'd do at least a 30 min boil, but no harm going a bit longer. The high temperature of pressure-canning and no way for steam to escape will result in converting all SMM to DMS. Another option would be to use a darker base malt (like English Pale Ale) which has already had most of the SMM destroyed.
Malt extract has the minerals concentrated, but I'm sure distilled to dilute would be fine.
Is it normal for it to bu chunky?
Likely just coagulated protein (break material), nothing to be worried about!
Post a Comment